***Congratulations to commenter #7 mah-meee from Raising A&C! You're the lucky winner! Be sure and check your email so I can get the hair clips out to you asap. Thanks to everyone for playing along! ***
I'm updating this post to link up to Works for Me Wednesday. After you finish reading it, be sure and check out all the other great tips at Shannon's place!
So, earlier this week I confessed that when it comes to styling my daughters' hair, I'm pretty much all thumbs.
But, after re-reading that post, I realized that I neglected to fill you in on the one secret weapon in my hairstyling arsenal. I mentioned it, but I didn't elaborate.
So, I'd like to introduce you to the flower clippie:

I like to call it the "smoke and mirrors approach" to styling hair. You see, my daughters' fine hair may never boast impressive volume or curl -- but any ol' style can be dramatically improved with a flower clipped on top. I present Exhibit A:

And Exhibit B:

See? You don't notice the hair, only the flower. Sneaky, huh? And here's the best part, you don't even have to spend $10 a clip. I made these for literally pennies. Here's what you need:

faux flowers, ribbon, brads, alligator clips (available at beauty supply stores), and a hot glue gun. I pick my flowers up at the dollar store. They don't have to be silk. They don't have to be expensive. Cheap will work just fine.
The first thing you want to do is pull the flowers off the plastic stems. Then, remove the center portion of the flower. If the flower petals are just one or two "ply," so to speak, remove a few extra flowers. We'll stack them, one on top of the other, to make them look fuller.

Then, go get yourself some brads:

You can pick brads up at a craft store. There are a ton of different styles. Choose whatever you like. I happen to be partial to the silver rhinestone variety.
Next, stack your petals. I used four single-ply flowers below. Then, run your brad through the center and secure.

Now, set that aside and forget about it for a second.
This is an alligator clip. Notice that there is a definite top and a bottom. The bottom is the straight side.

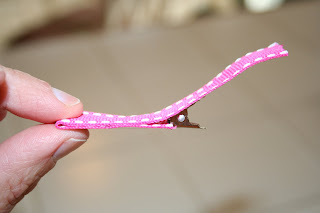
Hold the clip upside down (so the bottom edge is now facing the ceiling) and open the clip. Apply hot glue to the inside of the top of the clip (which is now functioning as the bottom). Then, take some ribbon and set it on top of the glued part like so:

Now, flip the clip back over so the bottom of the clip is back on the bottom. Apply more hot glue to the outside of the top of the clip, and fold the ribbon around the top of the clip to stick.

By the way, be very careful when you do this. You can get a pretty decent burn from getting hot glue on your fingers. (That's the voice of experience speaking.) Now, apply some hot glue to the bottom of the clip (the solid silver part only):
And wrap the ribbon around like so:
Trim off any extra ribbon. Now you're home free. All that's left to do is hot glue the flower onto the top of the clip. Viola!

You can do the same thing with larger flowers, by the way. Remove the center and stack a few layers of petals. The only difference here is you're going to hot glue the layers together, instead of using a brad:

Then, cut the "peg" end off the the flower center (so it will lay flat) and hot glue that puppy right onto the center of the petals.
Then, just hot glue the flower to your ribbon-covered alligator clip. Piece of cake.
Hey, how 'bout a giveaway? I'll make two sets of small flower clips and three larger gerber daisy clips for one lucky winner. Let's keep it nice and simple. Just leave a comment below. I'll close comments a week from today (Friday, February 20th at 11:59 p.m.) and use the random number generator to select a winner.
Good luck and happy clip making!


31 comments:
I'm gonna Stumble this post. What a fabulous tutorial!!
And I'm crazy enough to be tempted to run out for supplies to let the girls make some at Princess's birthday party this weekend. If I'm lucky I simply won't find the time to stop by the stores.
What a great tutorial!! I can't wait for my baby girl to get some more hair so I can make her some! =)
Adorable! Thank you!
You rock! Those are awesome...and I love it more that they're inexpensive to make!
My girls gave up on hair bows (my southern heart was so sad) a while ago, but I bet I could convince them to wear flowers...and how cute would that be for Easter!?
These are awesome. Thanks
These are adorable!
oh i hope i win! but if not, i must go make these!
thanks, they look adorable!
You make this look so easy! I love it! I'm going to have to try to make some of my own too!
Oh, Michelle. As "easy" as this may be, it's still way too complicated for me! So I'm the idiot who ends up paying money for these from moms who make them for pennies, like you! :) Why don't you start selling some????
We LOVE flower clippies at our house, and with two little girlies, I really SHOULD learn to make them. Instead . . . I'll just enter your giveaway. Will it be "fixed" if I win because you know me??
THANKS!!
These are so cute! i need to make some for my little punkin :-)
These are so cute! I bought some of these from Ebay awhile back (and they were NOT cheap), but I had no idea they were so simple to make. Thank you so much for showing us how! And I agree...you could absolutely open an Etsy shop.
thanks for sharing I think my daughter could possibly make some of these for her daughter after reading this
I would love to win some of these clips for my granddaughter
shopannies@Yahoo.com
Thanks for the directions. I have wanted to try this and now, I have no more excuses! How cute. My daughter loves her "fwowers" and I always order them online. Time to get my inner floral goddess in gear and make some!
Michelle, those are totally adorable! the Princess and the Look Alike both have fine hair, compounded by the fact that the princess will not let me cut it, so it's halfway down to her waist. If I don't win, I'll have to make some!
This is great. Now if I only had some girls...Of course, I have a couple of "nieces" that would love these! :)
Wow, my step-grandaughters would love these. However, I cannot get a permit to use a glue gun, so the only way they'll get 'em is if I'm randomly selected.
Great post with pics for those who are handy. Sigh, I am not.
You should also link up to Works for Me Wednesday because as the others have said, this is a great tutorial.
Too bad my girls are too big for cutesie little hair clips. Sigh...
Hi Michelle! We both went to Albion and know Lori. Anyway, I love this idea! I am going to make one for myself for our spring cruise. They have a tropical night and this would be perfect!
great tutorial- makes me have little girl envy!:) your little one is adorable by the way!!
This is genius! What a great idea.
And, pick me, please pick me. :)
I'm definitely making these...and I'd love to win yours too!
Hey I've seen those flowers all the time in my local pound shop. Now I know what to do with them. My daughter has a huge mass of curls so "styling" it goes right out the window. And I'm having a bit of a giveaway myself. TFS.
Love it, love it, love it!
Seriously, these are sooo cute and you did a great job of explaining, in detail and with pictures, all the steps!
I'm so excited to make these. And it'd certainly be great to win some too!
Thanks so much for sharing.
Great tutorial...I've done hairbows (took a class) but never tried the flowers- definitely going to have to try that! Thanks a bunch!
I love the brad idea! I've done something like this before but I just yanked the flower off the stem and glued it on the clip - stood up way to high that way though. The brad is a perfect solution.
Thanks for sharing!
I have hot glued something similar but never thought of using brads - great idea! I have some cute ones that I have never used.
Thanks!!
You have made some really cute clippies! I would love to get a few of these! Thanks for sharing your creations and showing us how to make them!
mommyhoodisthankless{AT}gmail.com
This is exactly the post I was looking for! I googled "how to make flower hair clips" and after looking at several, your tutorial was BY FAR the best. Thanks. I will now have something fun to do as I keep myself from thinking how baby #4 was due 5 days ago!
Great tutorial on how to make these hair clips. I've been wanting to try it but was afraid I wouldn't know what I was doing. You make it look very simple and do-able. Thanks for sharing!!!
Kelly
gentzkelly at hotmail dot com
what a fun idea! My little girl finally has enough hair to put clips in. These look like a nice idea to try!
Those are really cute - and so simple when you reveal your secrets! ;-) My little girl is into her bow hairclips now... I bet she would LOVE some flower ones! I just have to buy a glue gun. (No, I don't own one yet... I just wait and use my mom's when we're there. But I keep seeing these great ideas - I might have to break down and buy one.)
Post a Comment