***Congratulations to commenter #7 mah-meee from Raising A&C! You're the lucky winner! Be sure and check your email so I can get the hair clips out to you asap. Thanks to everyone for playing along! *** I'm updating this post to link up to Works for Me Wednesday. After you finish reading it, be sure and check out all the other great tips at Shannon's place!So, earlier this week I confessed that when it comes to styling my daughters' hair, I'm pretty much
all thumbs.
But, after re-reading that post, I realized that I neglected to fill you in on the one secret weapon in my hairstyling arsenal. I mentioned it, but I didn't elaborate.
So, I'd like to introduce you to the flower clippie:

I like to call it the "smoke and mirrors approach" to styling hair. You see, my daughters' fine hair may never boast impressive volume or curl -- but any ol' style can be dramatically improved with a flower clipped on top. I present Exhibit A:

And Exhibit B:

See? You don't notice the hair, only the flower. Sneaky, huh? And here's the best part, you don't even have to spend $10 a clip. I made these for literally pennies. Here's what you need:

faux flowers, ribbon, brads, alligator clips (available at beauty supply stores), and a hot glue gun. I pick my flowers up at the dollar store. They don't have to be silk. They don't have to be expensive. Cheap will work just fine.
The first thing you want to do is pull the flowers off the plastic stems. Then, remove the center portion of the flower. If the flower petals are just one or two "ply," so to speak, remove a few extra flowers. We'll stack them, one on top of the other, to make them look fuller.

Then, go get yourself some brads:

You can pick brads up at a craft store. There are a ton of different styles. Choose whatever you like. I happen to be partial to the silver rhinestone variety.
Next, stack your petals. I used four single-ply flowers below. Then, run your brad through the center and secure.

Now, set that aside and forget about it for a second.
This is an alligator clip. Notice that there is a definite top and a bottom. The bottom is the straight side.

Hold the clip upside down (so the bottom edge is now facing the ceiling) and open the clip. Apply hot glue to the inside of the top of the clip (which is now functioning as the bottom). Then, take some ribbon and set it on top of the glued part like so:

Now, flip the clip back over so the bottom of the clip is back on the bottom. Apply more hot glue to the outside of the top of the clip, and fold the ribbon around the top of the clip to stick.
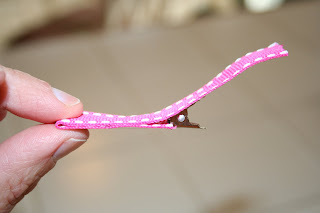
By the way, be very careful when you do this. You can get a pretty decent burn from getting hot glue on your fingers. (That's the voice of experience speaking.) Now, apply some hot glue to the bottom of the clip (the solid silver part only):
And wrap the ribbon around like so:
Trim off any extra ribbon. Now you're home free. All that's left to do is hot glue the flower onto the top of the clip. Viola!

You can do the same thing with larger flowers, by the way. Remove the center and stack a few layers of petals. The only difference here is you're going to hot glue the layers together, instead of using a brad:

Then, cut the "peg" end off the the flower center (so it will lay flat) and hot glue that puppy right onto the center of the petals.
Then, just hot glue the flower to your ribbon-covered alligator clip. Piece of cake.
Hey, how 'bout a giveaway? I'll make two sets of small flower clips and three larger gerber daisy clips for one lucky winner. Let's keep it nice and simple. Just leave a comment below. I'll close comments a week from today (Friday, February 20th at 11:59 p.m.) and use the random number generator to select a winner.
Good luck and happy clip making!